Wednesday 16 December 2015

Candy Cane Cookies

You better watch out...you better not cry....better not pout, I'm telling you why...Santa Claus is coming to town......
 
Wow!!!!!  xmas is just round the corner!!!  I chanced upon a cute candy cane cookie receipe in Taste of Home magazine and thought I should try it.  Oh my....these cookies are really delicious and buttery!!!!
 
Do note that the dough for this cookie is very very soft and difficult to handle.  Do not be tempted to add more flour...you would not want your cookie to taste floury and tough.  The receipe stated to refrigerate 1-2 hours.  However, the dough still remains too soft for me to roll into a candy cane.  In the end, I freeze the doughs for around 15 mins and they were easier to handle.
 
The divided doughs
 
Candy Cane Cookies
 
Ingredients
225g     Unsalted Butter, softened
180g     Sugar
1            Egg
2 tsp     Mint Extract
½ tsp    Vanilla Extract
330g     Plain Flour
½ tsp    Salt
Red Food Colouring
Green Food Colouring
 
Directions
  1. Using a hand mixer or standing mixer, cream butter and sugar until light and fluffy.
  2. Beat in egg and extracts.
  3. Combine flour and salt, gradually add to creamed mixture and mix well.
  4. Set aside half the dough.  Divide remaining dough in half.  Add green food colouring to one portion and red food colouring to the other.  Wrap the doughs separately in plastic wrap.
  5. Refrigerate 1-2 hours or until easy to handle.  I freeze the doughs for around 15 mins.
  6. Preheat oven to 180°C .
  7. Divide green and red dough into 20 portions each.  Divide plain dough into 40 portions.  Roll each into a rope.  Place each coloured rope next to the plain rope.  Press together gently and twist.  Repeat with remaining ropes.  Place 2 inch apart on ungreased baking sheets.
  8. Bake 10-12 minutes or until set.  Cool 2 minutes before carefully removing from pans to wire racks to cool completely.

Monday 7 December 2015

Herbs Dinner Roll

This herb dinner roll taste really delicious and fragrant with the herbs!  Even my kids love them!

Herbs Dinner Roll

Ingredients

1 cup    Water, warmed
2¼ tsp   Active dry yeast
350g     Bread flour
30g       Butter, melted
1            Egg
56g       Sugar
1 tsp     Salt
½ tsp    Dried basil, crushed
½ tsp     Dried Oregano, crushed
½ tsp     Dried Thyme, crushed
½ tsp     Dried Rosemary, crushed
Additional butter, melted

Directions
  1. Mix sugar and yeast in warm water till the yeast bubbles, around 5 mins.
  2. Put the yeast mixture into a standing mixer and add melted butter and egg, mix well.
  3. Mix the crushed basil, thyme, oregano, rosemary and salt in the flour and mix into the yeast mixture.
  4. Using the dough hook, mix till it forms a dough that is not sticky and it pulls away from the side of the mixing bowl.  Be careful not to add too much flour else the bread will be tough.  If the dough is sticky, add a tsp of flour at a time.
  5. Proof the dough in an oiled bowl for at least 1 hour, cover with cling wrap or damp cloth.
  6. Punch the dough down and separate the dough into small portions.  I measure 30g each and I have around 24 pcs of bread.
  7. Roll the dough to form a ball and place them on a buttered baking sheet pan.
  8. Let the doughs proof for another 45 mins to 1 hour, cover with cling wrap or damp cloth.
  9. Bake the breads at 170°C.
  10. Once done, brush the breads with butter.

Saturday 28 November 2015

Challah Bread (Egg Bread)

Challah is a traditional special Jewish braided bread eaten on Sabbath and Jewish holidays.  This bread was originally called hallah in Hebrew, since it was baked in the form of a round loaf.  It is usually braided, and has several eggs in it (hence it's nickname Egg Bread).  Challah can be in loaf form or braided, and may contain raisins and/or saffron.  Poppy seeds, sesame seeds and anise may be sprinkled on top of the bread.

You must try this bread as it is really soft and divine....

 
Challah Bread (Egg Bread)
 
Ingredients
 
1 cup      Water
1 tbsp     Instant Yeast
80g         Sugar    
3              Eggs
540g       Plain Flour
1 tsp        Salt
110g        Butter, softened
20g          Raisins (optional)
1 egg for glazing
 
Directions
  1. Dissolve the yeast in the water and add all the remaining ingredients.
  2. Knead with the dough hook for 6-8 minutes until the dough is smooth and pliable and comes off the sides of the bowl.
  3. Let the dough rise until doubled in size. About 1.5 hours at room temperature or overnight in the fridge.
  4. Punch the dough down and divide into 4 equal parts.
  5. Roll each part into a log the length of your sheet pan.
  6. Squeeze the top ends together.  Start braiding by taking the log closest to you Under Over and Under the other logs.  Click here for tutorial.
  7. When you are done braiding, squeeze the ends together, cover with plastic wrap and let the dough rise until you see tiny pockets of air, about 1 hour.
  8. Preheat the oven to 170°C.
  9. Crack 1 egg in a small bowl and whisk well.  Gently brush the challah with the egg glaze, careful not to deflate the bread.
  10. Bake for around 30 mins until golden brown and hollow sounding when tapped on the bottom. Cool on a wire rack.

Friday 27 November 2015

Bread Dough Shaping Technique - How to Do 4-Braiding

4 Braiding is as easy as 3 braiding.  However, the braided bread looks nicer (and seems more complicated!) than 3 braiding.  Don't be intimidated by the complicated look!

You may noticed that my dough does not seem smooth.  Reason being I avoid using too much flour when rolling the logs as it will cause the texture of the bread to be tougher.  I prefer soft textured breads... ;)

Step 1 : Roll out 4 same weight dough into a long rope with same length.

Step 2 : Line up the ropes and pinch the top of the dough together.
 
 Step 3 : Take the log from the left side and cross over the 2nd left log.
 
 Step 3 : Take the 2nd log from right, cross over the 1st left log.

Step 4 : Take the 1st left log, cross over the right log.

Repeat steps 1 to 4 till you finish braiding the dough.  Once done, tuck the remaining dough underneath the dough and form a nice finished 4 braid dough!
 

Saturday 21 November 2015

Cinnamon Bread

Recently, I am starting to have festive moods.  Shopping malls in Singapore have started to put up xmas tress.  Looking at these, how can I not be in festive mood??  Haha!

The 1st thing that came into my mind is cinnamon bread.  This is something that I had wanted to bake for many years but did not get a chance.  ok..ok...I am just giving excuses...I have been baking and why did I not have a chance to bake cinnamon bread??

You must try this cinnamon bread as it is soft and fluffy.  The aroma of cinnamon during baking is just awesome.  As I do not like things that are too sweet, I used cream cheese on the cinnamon breads instead of the usual sugar icing.  They were just divine....

Cinnamon Bread

Dough
1 cup       Whole Milk
135g        Sugar
14g          Active Dry Yeast
115g        Unsalted butter, softened to room temperature and cut into 4 pieces
2              Eggs
½ tsp       Salt
550g       Plain Flour

Filling
90g         Unsalted butter, softened to room temperature
100g       Sugar
1 tbsp     Ground Cinnamon

Cream Cheese Icing
56g        Cream Cheese, softened to room temperature
20g        Icing Sugar
3 tbsp    Milk
½ tsp     Vanilla Extract

Directions
  1. In a small saucepan, warm the milk over low heat until lukewarm.   Pour the warm milk into the bowl of a stand electric mixer fitted with the dough hook attachment.  With a spoon, manually stir in the sugar and yeast. Cover with a towel and let sit until the yeast is foamy, about 5-10 minutes.   On low speed, beat in the softened butter until it is slightly broken up.   Next add the eggs, one at a time, and then the salt.  The butter won't really be mixing into the mixture, so don't be alarmed if it stays in pieces.  On low speed, gradually add the flour.  Once it is all added, beat on medium speed until a soft dough forms.  Increase speed to medium-high and beat until the dough is soft and supple, about 6 minutes longer.
  2. Transfer the dough to a lightly floured surface and knead it with your hands for 1 minute.   Form the dough into a ball and transfer it to a lightly greased bowl.   Cover the dough loosely with plastic wrap and let sit in a warm place until doubled in size, about 1-2 hours.
  3. Butter/grease/spray with nonstick spray the bottom of a 9x13 inch baking dish, then line with parchment paper.  Turn the dough out onto a lightly floured work surface and, using a rolling pin, roll into a 13x18 inch rectangle.
  4. Spread the softened butter all over the dough.   In a small bowl, toss the cinnamon and sugar together until combined and then sprinkle evenly over the dough.  Tightly roll up the dough to form a log.  Cut into 18 even rolls. Arrange them in the prepared baking pan, cut sides up. Let the cut rolls proof for around 1 hour. 
  5. Preheat the oven to 375°F (191°C). Bake for about 25 minutes, until they are golden brown.
  6. Make The Icing : In a medium bowl using a handheld or stand mixer fitted with a paddle attachment, beat the cream cheese on medium speed until smooth and creamy.  Add the confectioners' sugar, milk, and vanilla. Beat on low speed for 30 seconds, then switch to high speed and beat for 2 minutes.  Using a knife, spread the icing over the warm rolls and serve immediately.

Wednesday 18 November 2015

Butter Cake

This butter cake receipe will yield a very soft texture and it melts in your mouth.  Remember to beat the batter longer to incorporate enough air into it.  Butter cake is best eaten the next day as the flavour needs time to seep through the cake.

Butter Cake

Ingredients

250g           Butter
250g           Self-Raising Flour
220g           Sugar
4                  Eggs
5 tbsp         Milk
1 tsp            Vanilla Extract

Directions
  1. Preheat the oven to 170°C.
  2. Prepare a lined 9" or 10" square pan.
  3. Sift the flour, and add in salt.  Set aside.
  4. In an mixing bowl, beat butter and sugar till pale and fluffy.
  5. Scrape the mixing bowl, add in the 1st egg and beat till sugar has totally melted.
  6. Add the eggs 1 at a time, beating thoroughly and scraping the mixing bowl in between till all eggs have been added.
  7. Mix in the flour in 3 portions.
  8. Add in the milk, and finally the vanilla extract.
  9. Bake in the oven for approximately 15-20 mins.

Wednesday 11 November 2015

3D Clutch Cake

This is the 2nd 3D cake I have made - a clutch.  The 1st one was a 3D Barbie doll princess cake for my little princess.
 
I have been wanting to make this clutch cake since 9 months ago....ya...it was that long!  I had been thinking what I should use to make the ball clasp and silver frame as I don't like the taste of fondant.  Finally I decided to make my own marshmallow fondant to replace the normal fondant.
 
I used 2 cake batter to make 4 cakes using bread loaf tins in order to make this 3D clutch cake.  I used a bit of red colouring for the 2nd cake batter.  You can see from the below photo, I alternate the colours of the cake.  For the internal frosting, I alternate the layers with swiss meringue buttercream and homemade strawberry sauce.  For the external frosting, I used swiss meringue buttercream.

This is an extremely pretty and delicious cake!


Slice the 4 edges of the top of the cake at 45° angle
 
Top view of the cake
 
Side view of the cake
 
3D Clutch Cake

Ingredients
 
Vanilla Cake
(A)
4         Egg Yolks
75g     Melted Butter
60g     Milk
30g     Sugar
¼ tsp  Salt
½ tsp  Vanilla Extract

(B)
120g    Cake Flour
¼ tsp  Baking Powder

(C)
4          Egg Whites
70g      Sugar
¼ tsp  Cream of Tartar

Frosting
Homemade strawberry sauce / strawberry jam
Swiss Meringue Buttercream
Red colouring

Decoration
Fondant / Homemade marshmallow fondant (tinted in grey)
Wilton Silver Pearl Dust
 
Directions
  1. Preheat oven to 160°C.
  2. Line 2 bread loaf tins with parchment paper.
  3. Use a whisk to mix ingredients (A).
  4. Sieve ingredients (B) and mix into (A).  Set aside.
  5. Use a stand mixer to whisk the egg whites till stiff peak.
  6. Fold in ¼ of the meringue into the egg yolk batter.
  7. Then fold in the rest of the meringue.
  8. Pour the batter into the bread loaf tins and bake for 25mins.
  9. Allow the cakes to cool and remove from pan.
  10. Slice each loaf into 2 horizontally.
  11. Bake another cake as above and add in a bit of red colouring.  Slice each loaf into 2 horizontally.
  12. You should have 8 slices of cakes in total.
  13. Put a layer of uncoloured cake on the bottom.  Cover it with buttercream.
  14. Put a layer of red colour cake on top and cover with strawberry sauce.
  15. Alternate the uncoloured and coloured cakes on top of each other with frostings till you have 6 layers.  You may keep or eat up the other 2 slices of cakes.
  16. Cover the entire cake with buttercream and put in the fridge for 15 mins.
  17. Slice the top 4 edges of the cakes at 45° angle.
  18. Cover the sliced edges with buttercream.
  19. Tint ¾ of the remaining buttercream with a bit of red colouring.
  20. Pipe rosettes around the cake.  Leave the top unpiped.
  21. Use the remaining ¼ buttercream and pipe the rosettes on top.
  22. Put the cake in the fridge for 30 mins.
  23. Roll out the marshmallow fondant and cut 2 long rectangles for the silver frame.  Stick both the rectangles together.
  24. Make 2 balls for the clasps.
  25. Brush the silver pearl dust on the balls and silver frame to give the shiny look.
  26. Line the silver frame on top of the cake, and stick the 2 balls on top of it.


Wednesday 4 November 2015

Rainbow Butter Cupcake


This cupcake uses the basic butter cake receipe from Agnes Chang's Baking Made Easy, but as usual, I tweaked the receipe slightly.  It is important to beat the batter for a longer period of time in order to yield an extremely soft butter cake.

Consistency of the final batter - very light and fluffy
 
I uses 3 colours for this rainbow butter cupcake
 
Can you see how soft this cupcake is?
 
My batch of rainbow butter cupcake on cooling rack
  
Rainbow Butter Cupcake 

Ingredients
250g           Butter
250g           Self-Raising Flour
220g           Sugar
4                  Eggs
5 tbsp         Milk
1 tsp           Vanilla Extract

Directions
  1. Preheat the oven to 190°C.
  2. Sift the flour, set aside.
  3. In an mixing bowl, beat butter and sugar till pale and fluffy.
  4. Scrape the mixing bowl, add in the 1st egg and beat till sugar has totally melted.
  5. Add the eggs 1 at a time, beating thoroughly and scraping the mixing bowl in between till all eggs have been added.
  6. Mix in the flour in 3 portions.
  7. Add in the milk, and finally the vanilla extract.
  8. Separate the batter into 3 bowls and add different colours in each bowl.
  9. Use a teaspoon, scoop a heaping teaspoon of each colour into the cupcake liner.
  10. Continue till all batter are finished - makes around 24 cupcakes.
  11. Bake in the oven for approximately 10-15 mins.

Wednesday 28 October 2015

Gula Melaka Huat Kueh (椰糖发糕)


Gula Melaka, as we Singaporeans and Malaysians call it, is also called coconut sugar.  It is widely used in the South-East Asia region, mainly in desserts as it has a strong coconut and caramel taste.
 
Huat Kueh (发糕)is a type of traditional steamed Chinese cake, was primarily used for paying respects to the Chinese deities during the festive seasons, as it symbolizes wealth and prosperity.
 
The huat kueh sold in stores are normally with added preservatives, tough and has a strong gluten smell.  This receipe will give you a soft huat kueh without any preservatives nor gluten smell.  After trying this, you will not want to buy huat kueh from stores.  :)
 
Gula Melaka Huat Kueh (椰糖发糕)
 
Ingredients
200g          Self-Rising Flour
200ml       Coconut Milk
140g          Gula Melaka
75ml          Water
1 tsp           Baking Powder
4-5 strips  Pandan Leaves
 
Directions
  1. Add the pandan leaves, coconut milk, water and gula melaka in a pan and cook with low heat till gula melaka dissolves.
  2. Stir continuously during cooking to prevent the sugar from burning.
  3. Preheat a large wok for steaming.
  4. Sift the self-rising flour and baking powder.  Add the gula melaka mixture and stir to combine.
  5. Line muffin tray with liners and fill them 90% with batter.
  6. Steam for about 25 mins with sufficient water.
  7. Leave in the steamer for another 1 min before removing the huat kueh.


Thursday 22 October 2015

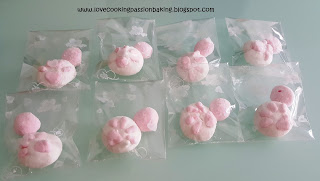
Cat Paw Marshmallow

Homemade marshmallows are very soft, like clouds, and melt in your mouth.  Instead of making the squarish marshmallows, tried the famed cat paw marshmallows....they are so cute!! :)  Children were crazy over this cutie pie candy!
 

Packed as gifts
 
Cat Paw Marshmallows
 
Ingredients
5g           Gelatine
30g         Ice Cold water
30g         Water
75g         Sugar
50g         Light Corn Syrup
1 Tbsp    Lemon Juice (optional)
A bit of Red colouring

1 cup      Corn Starch
1 cup      Powdered Sugar
 
Directions
 
  1. Mix the corn starch and powdered sugar and pour into a pan and cover the pan entirely with the mixture.
  2. Use a spoon to press round indentations onto the mixture.  Set aside.
  3. Bloom gelatine in a bowl with the ice cold water.  Set aside.
  4. Mix water, sugar and light corn syrup in a saucepan.  Boil till soft ball stage (approx. 120°C).
  5. Pour the boiled sugar syrup into the bloomed gelatine and use a hand mixer and mix on high speed, till the mixture thickens.
  6. Add the lemon juice and continue to mix for around 30 seconds.
  7. Scoop out around 2 tbsp of the white mixture and add a bit of red colouring, then put into piping bag.
  8. Pour the rest of the white mixture into another piping bag.
  9. Pipe the white mixture into the round indentations to make round marshmallows.
  10. Using the pink coloured mixture, pipe the paws onto the white marshmallows.
  11. Sift corn starch and powdered sugar mixture onto the marshmallows.
  12. Leave them to air dry for around 15 mins.


Sunday 18 October 2015

Marble Butter Cake

This marble cake uses the basic butter cake receipe from Agnes Chang's Baking Made Easy, but as usual, I tweaked the receipe slightly.  It is important to beat the batter for a longer period of time in order to yield an extremely soft cake.


Marble Butter Cake

Ingredients

250g           Butter
250g           Self-Raising Flour
220g           Sugar
4                  Eggs
5 tbsp         Milk
1 tsp            Vanilla Extract
1 tsp            Cocoa Powder
2 tsp            Hot Water

Directions
  1. Preheat the oven to 170°C.
  2. Prepare a lined 9" or 10" square pan.
  3. Sift the flour, set aside.
  4. In an mixing bowl, beat butter and sugar till pale and fluffy.
  5. Scrape the mixing bowl, add in the 1st egg and beat till sugar has totally melted.
  6. Add the eggs 1 at a time, beating thoroughly and scraping the mixing bowl in between till all eggs have been added.
  7. Mix in the flour in 3 portions.
  8. Add in the milk, and finally the vanilla extract.
  9. Mix the cocoa powder and hot water till all cocoa powder dissolves.
  10. Add in 3 tbsp of the cake batter into the cocoa powder paste.
  11. Pour in half the cake batter, followed by drizzling half of the cocoa batter.
  12. Pour in the rest of the cake batter and cocoa batter.
  13. Use a chopstick to mix both the batters slightly.
  14. Bake in the oven for approximately 15-20 mins.

Wednesday 14 October 2015

100% Wholemeal Mantou (100%全麦馒头)


For those who prefer a healthier option of Mantou, you may use wholemeal flour instead of plain flour to make mantou.  There is a new type of flour sold by Prima Flour - superfine wholegrain flour.  As this flour is really fine, I use 100% of it to make my wholemeal mantou.  Taste good!
 
 
This is the texture of the mantou.  The layers you see is the result of the foldings in my instructions below.

100% Wholemeal Mantou (100%全麦馒头)

230-240g    Prima Superfine Wholegrain Flour
¾ cup          Warm Milk
80g               Sugar
1 tsp              Baking Powder
2 tsp             Instant Yeast
¼ cup            Oil                       

Directions
  1. Mix the warm milk, sugar and yeast in a bowl and let the yeast blooms, around 5-10 mins
  2. Sift the flour together with the baking powder.
  3. Mix the dry ingredients with the wet ingredients (milk mixture and oil) and form a soft dough.
  4. Knead the dough till smooth, around 5 mins. 
  5. Put the dough in an oiled bowl and cover with clean moist towel or cling wrap and let it rise till double - around 1½ hours.
  6. Punch down the dough to remove any air bubbles.
  7. Knead the dough for another 10 mins till smooth.  You may add food colourings at this point when you are kneading.
  8. Roll the dough out into rectangle.  Fold the top and bottom into the centre.  Turn another direction, roll the dough into a rectangle again.  Fold the top and bottom into the centre.
  9. Roll the final dough into a log and cut into even pieces.
  10. Cover your final product with clean mist towel or cling wrap and let them rise again for around 20-30 mins.
  11. Prepare your steamer and bring the water to a boil.  To prevent the buns from sticking, line it with parchment paper or cheese cloth.
  12. Steam the buns on medium heat for 15 mins.  Open the lid slightly for 5 mins before removing the buns from the steamer.

Friday 9 October 2015

RMB5,000 Bread


This receipe has a funny name as it has a story behind it.  There was a chef who spent a long time searching for this receipe, and in the end, he spent RMB5,000 just to find this receipe.  So the story is interesting and I should try making it to see how good it is! ;)  But as usual, I always adjust the original receipe.   I have adapted this receipe from Victoria Bakes.

With this receipe, I have made 3 types of bread - Plain, Cheese and Sugar Butter.  You may refer to my posts on bread dough shaping techniques - rosette and 3-braiding
 
Last proofing process

In the oven!
 
RMB5,000 Bread

Ingredients
 
Starter Dough
210g    Bread Flour
90g      Cake Flour
24g      Sugar
6g        Instant Yeast
280g    Milk

Main Dough
210g       Bread Flour
90g         Cake Flour
100g       Sugar
1½ tsp   Salt
24g         Milk Powder
2             Eggs
54g         Milk
85g         Butter, softened

Directions
  1. Mix all starter dough ingredients together and allow to sit in a warm environment to rise till it looks like “honeycomb”.
  2. Mix the starter dough with main dough ingredients, except butter, and knead till it is soft and non-sticky.  Incorporate butter and knead till it is shiny and pliable.
  3. Allow dough to rise till double in size.
  4. Punch dough down, divide the dough into 45g each and make a 15cm rope and do braiding or make rosettes.  Alternatively, you could shape it into a ball.
  5. Place shaped buns into greased baking pan.  Cover with cling wrap and allow to rise till double, around 30-45 mins.
  6. Bake in 180°C preheated oven on lower rack for 20 mins.
  7. Brush baked rolls with melted butter.

Thursday 8 October 2015

Bread Dough Shaping Technique - How to Do 3-Braiding


3-Braiding is easy.  It is like plaiting your hair. ;)  I will show you how to braid using dough.
 
 
Step 1 : Roll out 3 same weight dough into a long rope with same length.
 
 Step 2 : Line the rope as below, pinch the top ends together.
 
Step 3 : Bring the left rope over the middle rope, followed by the right rope to the middle rope.  Continue till you reach the end of the rope.
 
Step 4 : When you are done, tuck both ends behind the dough and you will have neat and nice braid!

Wednesday 7 October 2015

Bread Dough Shaping Technique - How to Shape Rosette


Making rosette is not very difficult.  It is like tying a knot.

Step 1 : Roll the dough into a rope.

Step2 : Tie a knot.

Step 3 : Pull the left end over the dough to the middle and tuck it inside.  Then pull the right end under the dough to the middle and tuck it inside.  Voila!  You have made your rosette!

Wednesday 30 September 2015

Focaccia Bread


Focaccia is an Italian flatbread.  I love Focaccia as it is infused with various aromatic herbs and olive oil.  It does not require any spreads as it is itself very tasty.  You may be surprise, but I find that Focaccia taste best after it is being reheated in the oven.
 
Focaccia
 
Ingredients
 
448g       All Purpose Flour
2tsp        Sugar
1 tsp       Salt
1 tbsp     Active Dry Yeast
1 cup      Warm Water
¼ cup    Olive Oil
1              Egg
1 tsp       Dried Oregano
1 tsp       Dried Thyme
1 tsp       Garlic Salt
1 tsp       Onion Powder
1 tsp       Dried Rosemary, crushed
 
Directions 
  1. Preheat the oven to 200°C.
  2. Proof yeast in warm water and sugar till bubbles form - around 5 mins.
  3. Combine flour, salt, dried oregano, dried thyme, garlic salt and onion powder.  Mix well.
  4. Combine the yeast mixture, egg and olive oil in a mixing bowl.
  5. Mix in the flour mixture and using a hook attachment, mix till the dough is smooth and elastic, around 10 mins.
  6. Turn the dough out on a working table and fold over itself a few times.
  7. Cover with cling wrap and proof for 45 mins or till doubled in size.
  8. Line an oiled greasproof paper in a sheet pan.
  9. Turn out the dough, roll and stretched the dough out to an oblong or round shape, about ½ inch thick.
  10. Lay the dough on the pan and cover with cling wrap.
  11. Let it rest for 15 mins.
  12. Bake in the bottom rack for 15-20 mins. 

Saturday 26 September 2015

Pandan Chiffon Cake


Pandan chiffon cake is unique to Singapore.  Many tourists tend to buy this uniquely Singapore cake back to their hometown.  It is a very light cake with the aroma of pandan leaf and coconut.  I find that most bakeries do not bake chiffon cake well as it tends to be dry - I prefer cakes that are moist.  If you follow my receipe below and beat the egg white properly, you will get a moist chiffon cake.  If you do not have pandan juice, you can substitute with 1 tbsp of water plus a few drops of pandan paste.

This is an adapted receipe from Agnes Chang's book "Baking Made Easy".

Please make sure you beat the egg whites to stiff peak.  Don't overbeat as the cake will become dry.

Pandan Chiffon Cake

Ingredients

150g       Self-Raising Flour
140g       Sugar
5             Egg Yolks
5 tbsp    Thick Coconut Milk
4 tbsp    Water
2 tsp      Pandan Juice
5             Egg Whites
½ tsp    Cream of Tartar

Directions
  1. Combine sifted flour, thick coconut milk and pandan juice in a bowl.  Use a whisk to stir well and set aside.
  2. Put egg whites and cream of tartar in a mixing bowl, beat on medium speed till stiff peak.
  3. Fold egg whites into (1).
  4. Pour batter into a 22cm chiffon cake tin.  Do not grease or line the tin.
  5. Bake in a preheated oven at 150°C for 15 mins till lightly brown.  Then increase the temperature to 160°C and continue baking for 10 mins.
  6. Remove from oven, invert, and leave to cool completely before removing cake from the tin.

Thursday 24 September 2015

Homemade Pure Pandan Juice (纯斑蓝叶汁)

Pandan leaf, also called screwpine leaf, is commonly used in Southeast Asia as it is very fragrant.  It is normally used in desserts, to wrap chicken, meat, etc, and to cook rice (which is called lasi lemak).

Homemade pure pandan juice is easy to make.  You just need to leave the raw solution to sit in the fridge untouched for 2-3 days and you will get your purest pandan juice!

The blended solution

 After straining the blended solution 

Transfer the strained solution into a bottle/container

 After sitting in the fridge for 2 days, you can see that the solution has separated into 2 layers

After pouring out the top layer, you get your purest pandan juice!

Homemade Pure Pandan Juice (纯斑蓝叶汁)

Ingredients

12 Strips         Pandan Leaves
½ cup               Water

Directions
  1. Cut the pandan leaves into small strips.
  2. Put the pandan leaves and water into a blender and blend till you get a green solution.
  3. Strain the solution to remove the blended pandan leaves.
  4. Put the solution in a bottle/container and leave in the fridge for 2 days.  Do not touch or move the bottle!
  5. You will see that the solution will be separated into 2 layers - a dark green solution which is at the bottom of the bottle, and a murky solution which is on top of the bottle.
  6. The dark green solution is the pure pandan juice which you want.
  7. Remove the murky solution on top by slowing pouring it away, and leave the pure pandan juice in the bottle.
  8. Use the pure pandan juice within 2 days.